본 포스팅은 Vuetify를 활용한 Alert Component 제작기를 담고 있습니다.
배경 : 사용자가 정보를 등록하거나 업데이트할 때마다 띄워줄 Alert Component를 제작
1. 다양한 페이지에서 쓰일 수 있기에 매번 import하는 것보다 Global import가 마땅하다 판단
1-1. @/components/Module/AlertDialog.vue 해당 경로에 적당한 Component를 제작
- trigger를 통해서 v-model:dialog를 열어주고, setTimeout으로 닫아주도록 제작(문서 내 2-3 코드 확인)
1-2. main.js에 global import(전역 등록)
// main.js
Vue.component("AlertDialog", () => import("@/components/Module/AlertDialog.vue"))
배경
: Global로 등록했으나, router가 변경되는 상황에서는 setTimeout 끝까지 기다리지 않고 dialog도 함께 없으질 것으로 판단.
: Parent Component에서 dialog를 toggle해주는 methods를 매번 등록해야하는 불편함.
So, 어디에서든 켜져있는 Parent component와 어디에서든 접근할 수 있는 데이터가 필요.
- 어디에서든 켜져있는 Parent component = Navigation Component
- 어디에서든 접근할 수 있는 데이터 = Vuex(store)
2. Vuex(store) + Navigation을 활용한 컴포넌트 제작
2-1. Vuex(store > index.js)
차후 사용처(2-4)에서 "dispatch"를 통해
store의 actions를 호출하면,
actions에서 mutation를 호출하고,
mutations에서 state의 데이터를 변이시킨다.
export default new Vuex.Store({
  state: {
    alertDialogToggle: false,
    alertDialogInfo: null,
   },
  mutations: {
    openAlertDialog(state, payload) {
      state.alertDialogInfo = payload
      state.alertDialogToggle = true
    },
    closeAlertDialog(state) {
      state.alertDialogInfo = null
      state.alertDialogToggle = false
    },
  },
  actions: {
    // Alert Dialog
    openAlertDialog({ commit }, alertDialogInfo) {
      commit("openAlertDialog", alertDialogInfo)
    },
    closeAlertDialog({ commit }) {
      commit("closeAlertDialog")
    },
  },
2-2. Navigation (components > NavBar.vue ) *제작하는 웹페이지 어디에서든 열려있는 네비게이션 컴포넌트
Tip. alert-dialog에 v-if를 넣어서 props undefied를 방지함과 동시에, Toggle이 닫히면 component가 destroy될 수 있도록 한다.
<template>
    <alert-dialog
      v-if="alertDialogToggle" // Tip
      :dialog="alertDialogToggle"
      :timeout="alertDialogInfo.timeout"
      :emoji="alertDialogInfo.emoji"
      :title="alertDialogInfo.title"
      :firstLineText="alertDialogInfo.firstLineText"
      :secondLineText="alertDialogInfo.secondLineText"
      :thirdLineText="alertDialogInfo.thirdLineText"
    ></alert-dialog>
</template>

<script>
import { mapState } from "vuex"
export default {
  components: {
    AlertDialog,
  },
  computed: {
    ...mapState(["alertDialogToggle", "alertDialogInfo"]),
    //   alertDialogToggle() {
    //     return this.$store.state.alertDialogToggle
    //   },
    //   alertDialogInfo() {
    //     return this.$store.state.alertDialogInfo
    //   },
  },
}
</script>
2-3. Alert Dialog Component (component > module > AlertDialog.vue)
<template>
  <v-dialog v-model="dialog" max-width="250">
    <v-card>
      <v-card-title class="justify-center mb-4" style="font-size: 2rem;">
        <div>{{ emoji }}</div>
      </v-card-title>

      <v-card-subtitle class="text-center pb-2 font-weight-bold">
        <div>{{ title }}</div>
      </v-card-subtitle>

      <v-card-text class="text-center">
        <div v-if="firstLineText">{{ firstLineText }}</div>
        <div v-if="secondLineText">{{ secondLineText }}</div>
        <div v-if="thirdLineText">{{ thirdLineText }}</div>
      </v-card-text>
    </v-card>
  </v-dialog>
</template>

<script>
export default {
  // props: ["title", "firstLineText", "secondLineText", "ThirdLineText", "btnText", "dialog"],
  props: {
    dialog: Boolean,
    timeout: {
      type: Number,
      default: 1000,
    },

    emoji: String,
    title: String,
    firstLineText: String,
    secondLineText: String,
    thirdLineText: String,
  },
  mounted() {
    setTimeout(() => {
      this.$store.dispatch("closeAlertDialog")
    }, this.timeout)
  },
  // destroyed() {
  //   console.log("destoyed")
  // },
}
</script>

<style></style>
2-4. 사용처 사용방법과 결과 화면
다른 로직을 완수한 후 openAlert() methods를 호출하여
데이터를 셋팅하고 dispatch를 통해 store의 내용을 변경한다.
곧바로 $this.router.push로 페이지를 이동시켜도
destoyed되지 않고 정상 작동하는 모습을 볼 수 있다.
  methods: {
    openAlert() {
      let alertDialogInfo = {
        // timeout: 5000,
        emoji: "🙏🏻",
        title: "카페가 성공적으로 등록되었어요!",
        firstLineText: "도움에 감사드립니다",
        secondLineText: "by.ccaaffee",
        // thirdLineText: "셋째줄",
      }
      this.$store.dispatch("openAlertDialog", alertDialogInfo)
    },
 }

추가 팁
Parent에서 child로 Number 타입의 "params" props를 넘기고 싶다면
// Child
props: {
  params: {
     type: Number
  }
}


// Parent
<parent :params="5000" />
// params="5000" 와 같이 넘기면 String 타입으로 에러 발생
2편 예고 : Vue Global Alert Component 제작기(2)
: 부모에게 대드는 자식을 잡아보자.
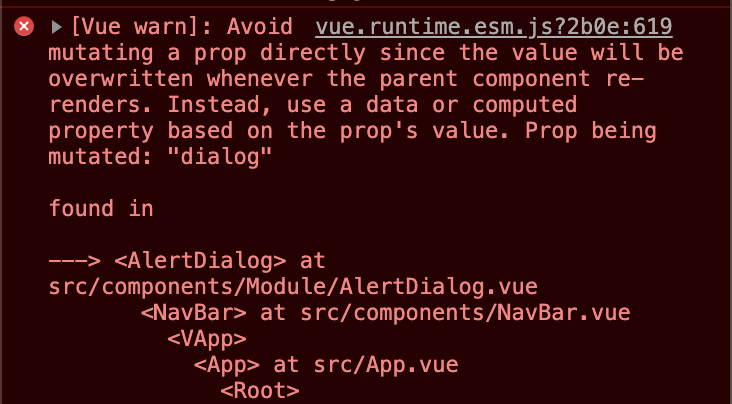
AlertDialog가 create되고, 우리가 설정한 timeout이 지나서 destroy되기 전에 dialog overlay를 클릭하면 발생하는 에러
[Vue warn]: Avoid mutating a prop directly since the value will be overwritten whenever the parent component re-renders. Instead, use a data or computed property based on the prop's value. Prop being mutated: "dialog"

*본 포스팅의 모든 코드 블럭에는 주제와 무관한 내용의 코드를 생략하였습니다.
잘하셨습니다, OHMH(애매)
2021.02.20.
'CCAAFFEE > Dev' 카테고리의 다른 글
| 에러 : error FirebaseError: Firebase Storage: User does not have permission to access ... (1) | 2021.02.19 |
|---|